


Learning how to automate tasks with ChatGPT will literally give you superhuman capabilities.
The moment I figured out how to leverage ChatGPT to not just generate text and be my therapist, but actually go out and do tasks for me, everything changed.
Instead of spending hours on routine tasks, manually researching, summarizing data, filling out Google Docs or Sheets, drafting emails, I had an AI assistant handling it all in the background.
You don’t even need to be an AI Engineer to do this stuff. I’m not a programmer and I’ve been able to automate a lot of things in my daily work life.
In this article, I’m going to show you how to automate tasks with ChatGPT and we’ll even go through one of my own workflows. But first, let’s understand how this is going to work.
Can I use ChatGPT to automate tasks?
Yes, you can automate work tasks with ChatGPT. However, to get the best results, you’ll want to integrate it with an AI automation platform.
ChatGPT is simply an AI model, or LLM (large language model), that is designed to understand an input and generate text based on the prompt you give it. In order to create a fully automated workflow, that works on your behalf, you need to have another layer of tooling that can take inputs you give ChatGPT, complete tasks based on triggers, and then output a result.
In other words, you need a workflow that automates ChatGPT like this:
- Sends a trigger to ChatGPT to run a prompt.
- Take ChatGPT’s response, process it, and route it to the right place — to tools you use like Google Sheets, Notion, Slack, or whatever.
- Give you an output or run the task automatically on repeat.
The good news is: it’s all possible.
If you can understand a task and do it manually, you will be able to automate it. This is where AI agent platforms come to play.
Alright, let’s do some magic and automate a real workflow I personally use with ChatGPT.
How to automate a workflow on ChatGPT (in 4 steps):
Here are four steps to automating tasks with ChatGPT:
- Find repetitive tasks you want to automate
- Use an AI automation tool that works with ChatGPT
- Create your automation flow
- Test and refine your workflow
Alright, let’s go over each one in depth.
1. Find repetitive tasks you want to automate
The first step to automating ChatGPT is to figure out what you even want to automate (duh!). Think about the stuff you do at work, or even in your personal digital life on a daily or weekly basis.
It could be as simple as finding someone’s email to send a cold outreach email to, to something more advanced like monitoring any posts about your brand on social media that speak negatively about you.
Here are some examples of tasks you could automate:
Content creation & management
If you work in marketing, you could automate parts of the content process like:
- Automatically generating social media posts from blog articles
- Automating a keyword research process for SEO
- Creating email newsletters from company updates
- Converting technical documentation into user-friendly guides
- Generating ecommerce product descriptions from specifications
If you can do it manually, there’s a good chance you can automate it.
Customer support
If you work in customer service, there are many different things you can automate like:
- Analyzing customer emails and auto-generate responses
- Categorizing support tickets by urgency and department
- Creating FAQ answers from common customer questions
- Summarizing customer feedback into actionable insights
Automating any CX task will definitely help you breathe a little during peak hours.
Data Processing
If you’re looking to process documents and extract specific data you can automate things like:
- Extracting key information from unstructured documents
- Converting raw data into formatted reports
- Analyzing competitor websites and generate summaries
- Transforming technical specs into marketing points
Research & analysis
Whether you work data analytics, do R&D work, or you’re a student, you could automate tasks like:
- Summarizing research papers or articles
- Generating market research reports from multiple sources
- Creating competitive analysis from public data
- Extracting insights from industry news
Document automation
If you want to automate operational scheduled tasks at work, you can look into:
- Generating personalized emails at scale
- Creating meeting summaries from transcripts
- Converting bullet points into full paragraphs
- Transforming raw data into formatted reports
These are just examples of what you can automate. But it’s not just limited to what I went over.
Think of it this way: If there’s something you do that can be broken down into clear steps for someone else to do, you can automate it with AI.
But, you might be asking yourself how you can even automate all this stuff with ChatGPT? After all, ChatGPT is an LLM and not necessarily an AI automation framework.
Well, I’m about to blow your mind in step two.
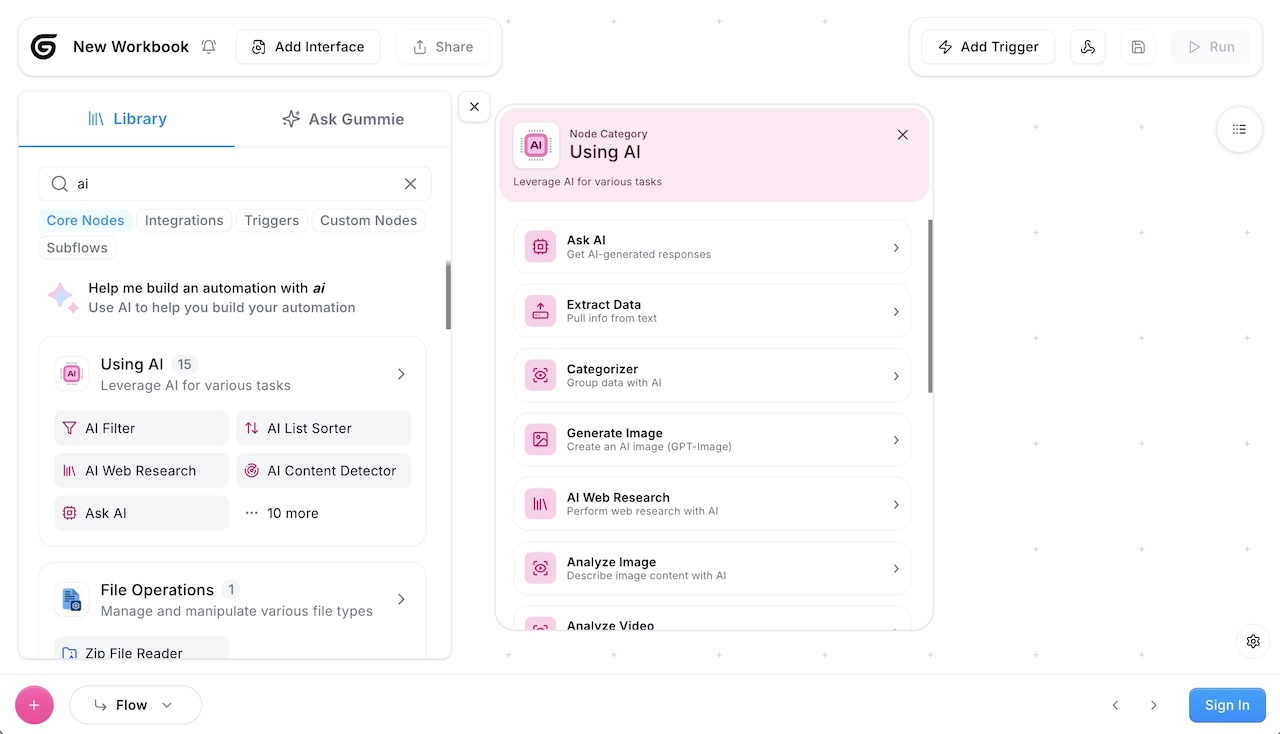
2. Use an AI automation tool that works with ChatGPT
The best way to automate everyday tasks with ChatGPT is to pair it up with an AI automation platform. This is where an AI tool like Gumloop comes in handy.
With Gumloop, you can create ChatGPT agent automation workflows that leverage ChatGPT's capabilities without writing any code. All of the examples of tasks to automate that we just went over in step one can be done with Gumloop. All with no-code.
If you have used Zapier before, it's kinda like that but with an AI layer over it (which lets you leverage ChatGPT).
I don't want to be biased, I only ever recommend tools I personally use myself. But, there's also another AI automation tool that's just as popular as Gumloop called n8n. It's like Coke vs Pepsi. Different taste for different people. If you want to compare it to Gumloop, you can read by comparion between Gumloop vs n8n.
The advantage of using an automation platform is that you can combine ChatGPT with other tools like Gmail, Slack, or Google Sheets. This means you can create end-to-end workflows where ChatGPT's output is automatically sent to the right place or person.
Best of all, these ChatGPT automations run continuously in the background, saving you hours of manual work. Instead of copying and pasting between ChatGPT and other tools, you can set up a flow once and let it run automatically whenever needed.
The cool thing about Gumloop is that you can integrate it with all models of ChatGPT — with just a single Gumloop account. You don’t even have to pay for a premium version of ChatGPT to get access to the higher end models. So no need to worry about connecting and APIs or anything.
This way, you can stay confident knowing that your tasks are being automated with the latest OpenAI models.
Alright, for the next two steps I’m going to automate a task that I personally do quite often — create blog outlines based on a keyword.
Editor's note: This entire tutorial can be followed with Gumloop's free plan — it's very generous. But, if you want to create even more AI workflows, I convinced the CEO of Gumloop to give my readers a discount on paid plans. Use code MARKETERMILK at checkout to get 20% off any paid plan.
3. Create your automation flow
The first step to create an automated flow is to sign up for a free account with Gumloop. They give you 1,000 credits to get started, and this is more than enough to run your first flow. Trust me.
You can also use a preexisting template to get your workflow set up faster.
As mentioned, I’m going to create a workflow that takes a keyword and outputs a blog outline in a Google Doc.
We are going to have this flow follow these steps:
- Input a keyword and do a Google search
- Scrape top ranking websites
- Use ChatGPT to analyze them and give us a better outline
- Have the outline input itself into a Google Doc
Alright let’s open up Gumloop and start adding Nodes (aka actions to be taken).
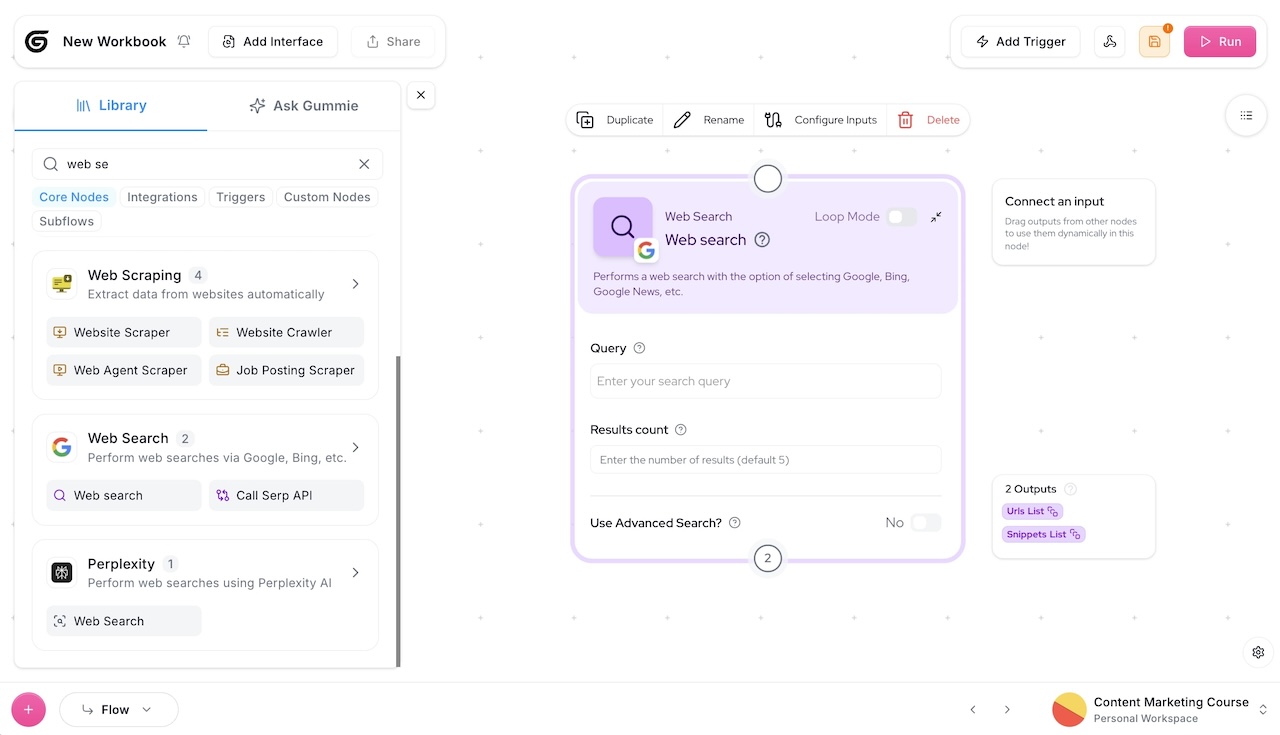
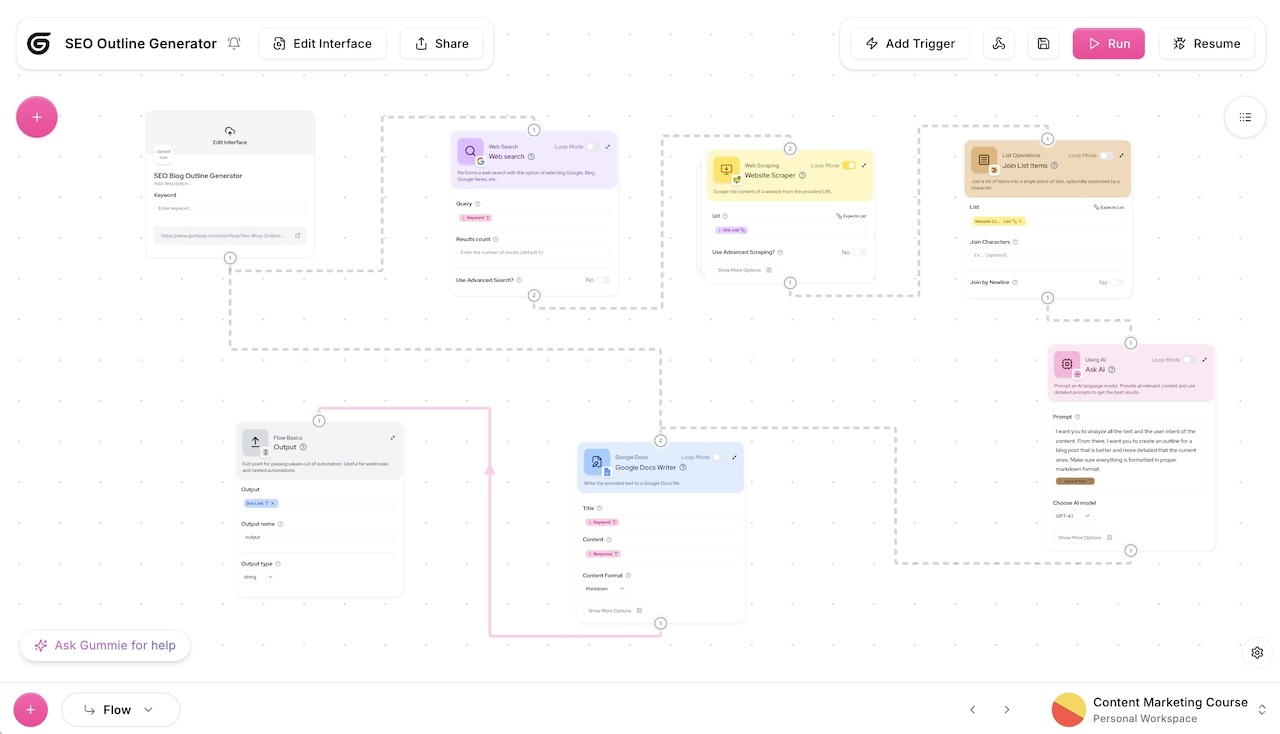
First, go to the Node Library and search for the Web search node. Once you find it, drag it onto the canvas.
Side note: If you get stuck during any step, you can Ask Gummie (their in-product chatbot AI assistant) and get help on any automation flow you’re creating. You can also ask Gummie for other use case ideas on what tasks to automate.
The Web search node allows us to input a search query and do a Google search that looks at a set number of results (in this case the default is set to five). You can also toggle on the Advanced Search functionality to change your search engine to Bing as well.
In this case, we’ll keep the default. Now, we go on to step two — scrape the top results.
Here, we want to search for and add the Website Scraper node.
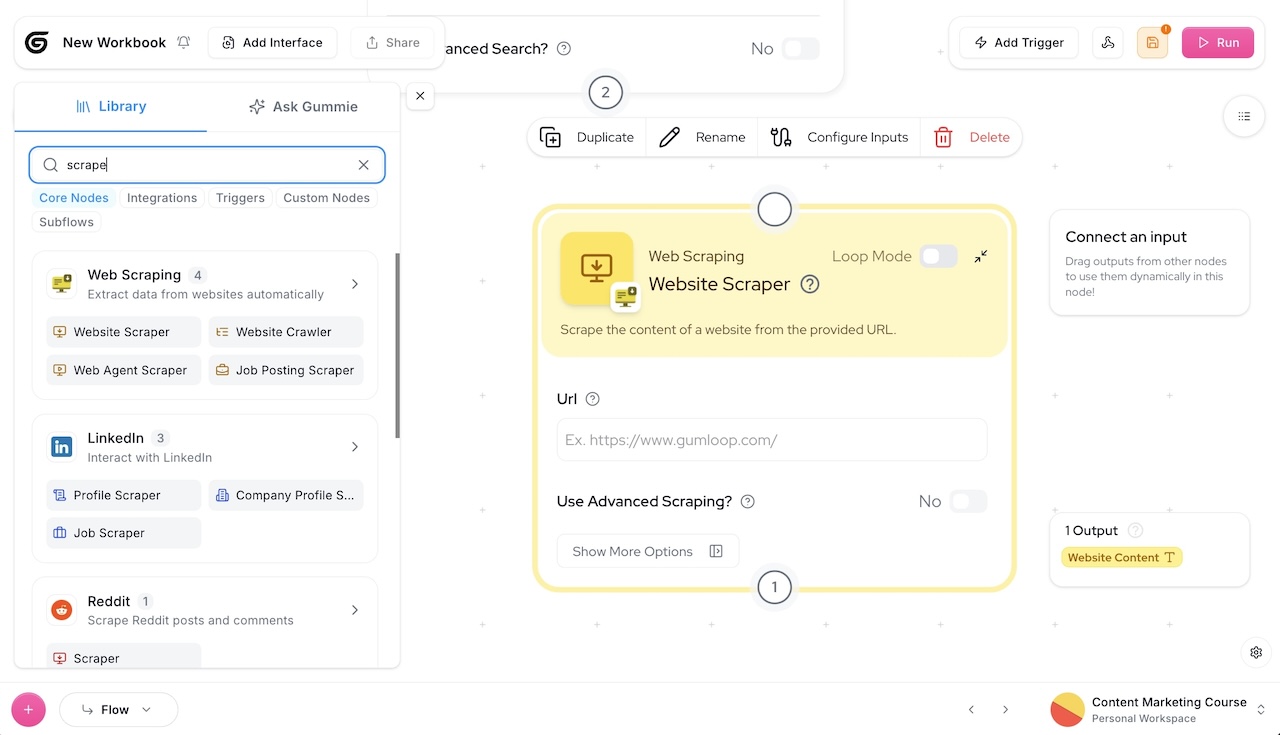
We now want to connect the “urls” from the Web Search node to the “url” of the Website Scraper node.
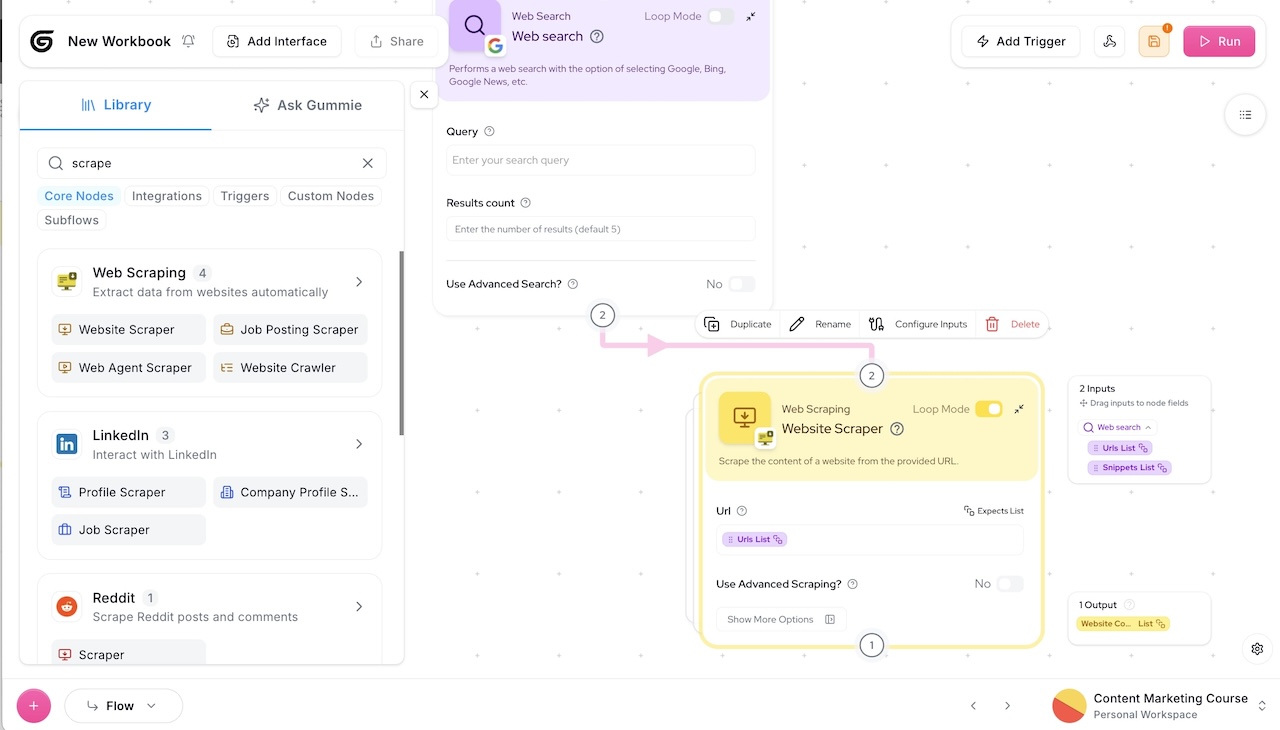
You’ll notice once you do this, the Website Scraper will automatically go into what’s known as “Loop Mode”. It does this because we are passing more than one URL from the Google Search node above. The Website Scraper node is going to “loop” through all of the URLs and scrape them one by one.
Alright, step three — prompt ChatGPT.
Here, we want to add the Ask AI node to our canvas.

However, before we connect anything, we actually need a small step before we pass our website scraping data into ChatGPT.
Right now, if we connect our scraped data and input it into our AI node, the Ask AI node will go into Loop Mode (because we are passing multiple URLs to it). However, we do not want that.
We want to summarize all of our scraped data to send to ChatGPT. So, we need to combine multiple scraped website contents into a single text before sending to Ask AI.
To do this, we are going to use the Join List Items node between the Website Scraper and Ask AI nodes. This node will:
- Take the list of scraped contents
- Combine them into one piece of text
- Enable the "Join by Newline" parameter to keep content readable
This way, instead of Ask AI processing each website separately in Loop Mode, it will receive one consolidated text containing all website contents, allowing it to analyze everything together for a better outline.

Now, we connect everything together. We want to take our list and pass it as Context to the Ask AI node (aka ChatGPT). This way, we can write out a prompt for ChatGPT and give it context based on the URLs we scraped.
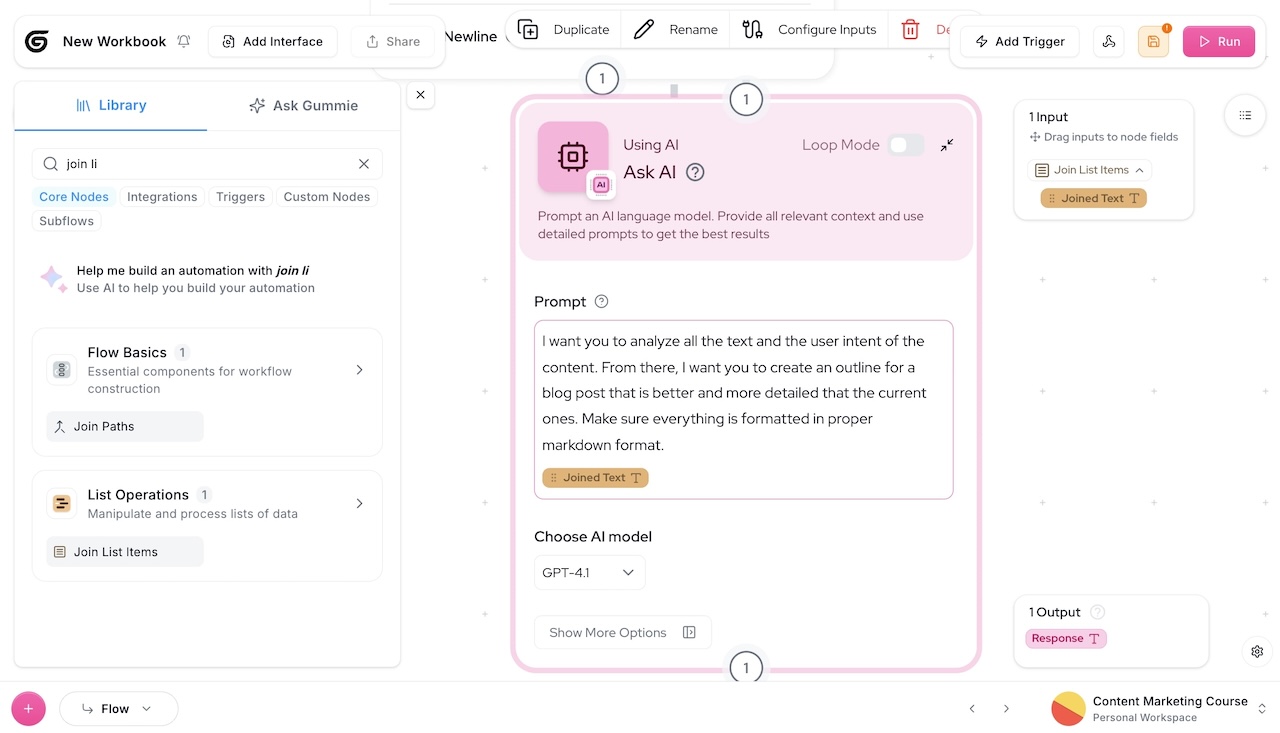
Here, we can prompt ChatGPT and also choose our AI model. You can pick from all the popular LLMs and models. For our case, I’m going to pick the GPT-4.1 model.
Now, we want to have ChatGPT automate our outline creation task by outputting everything into a Google Doc. For this, we want to add the Google Doc node in our canvas.
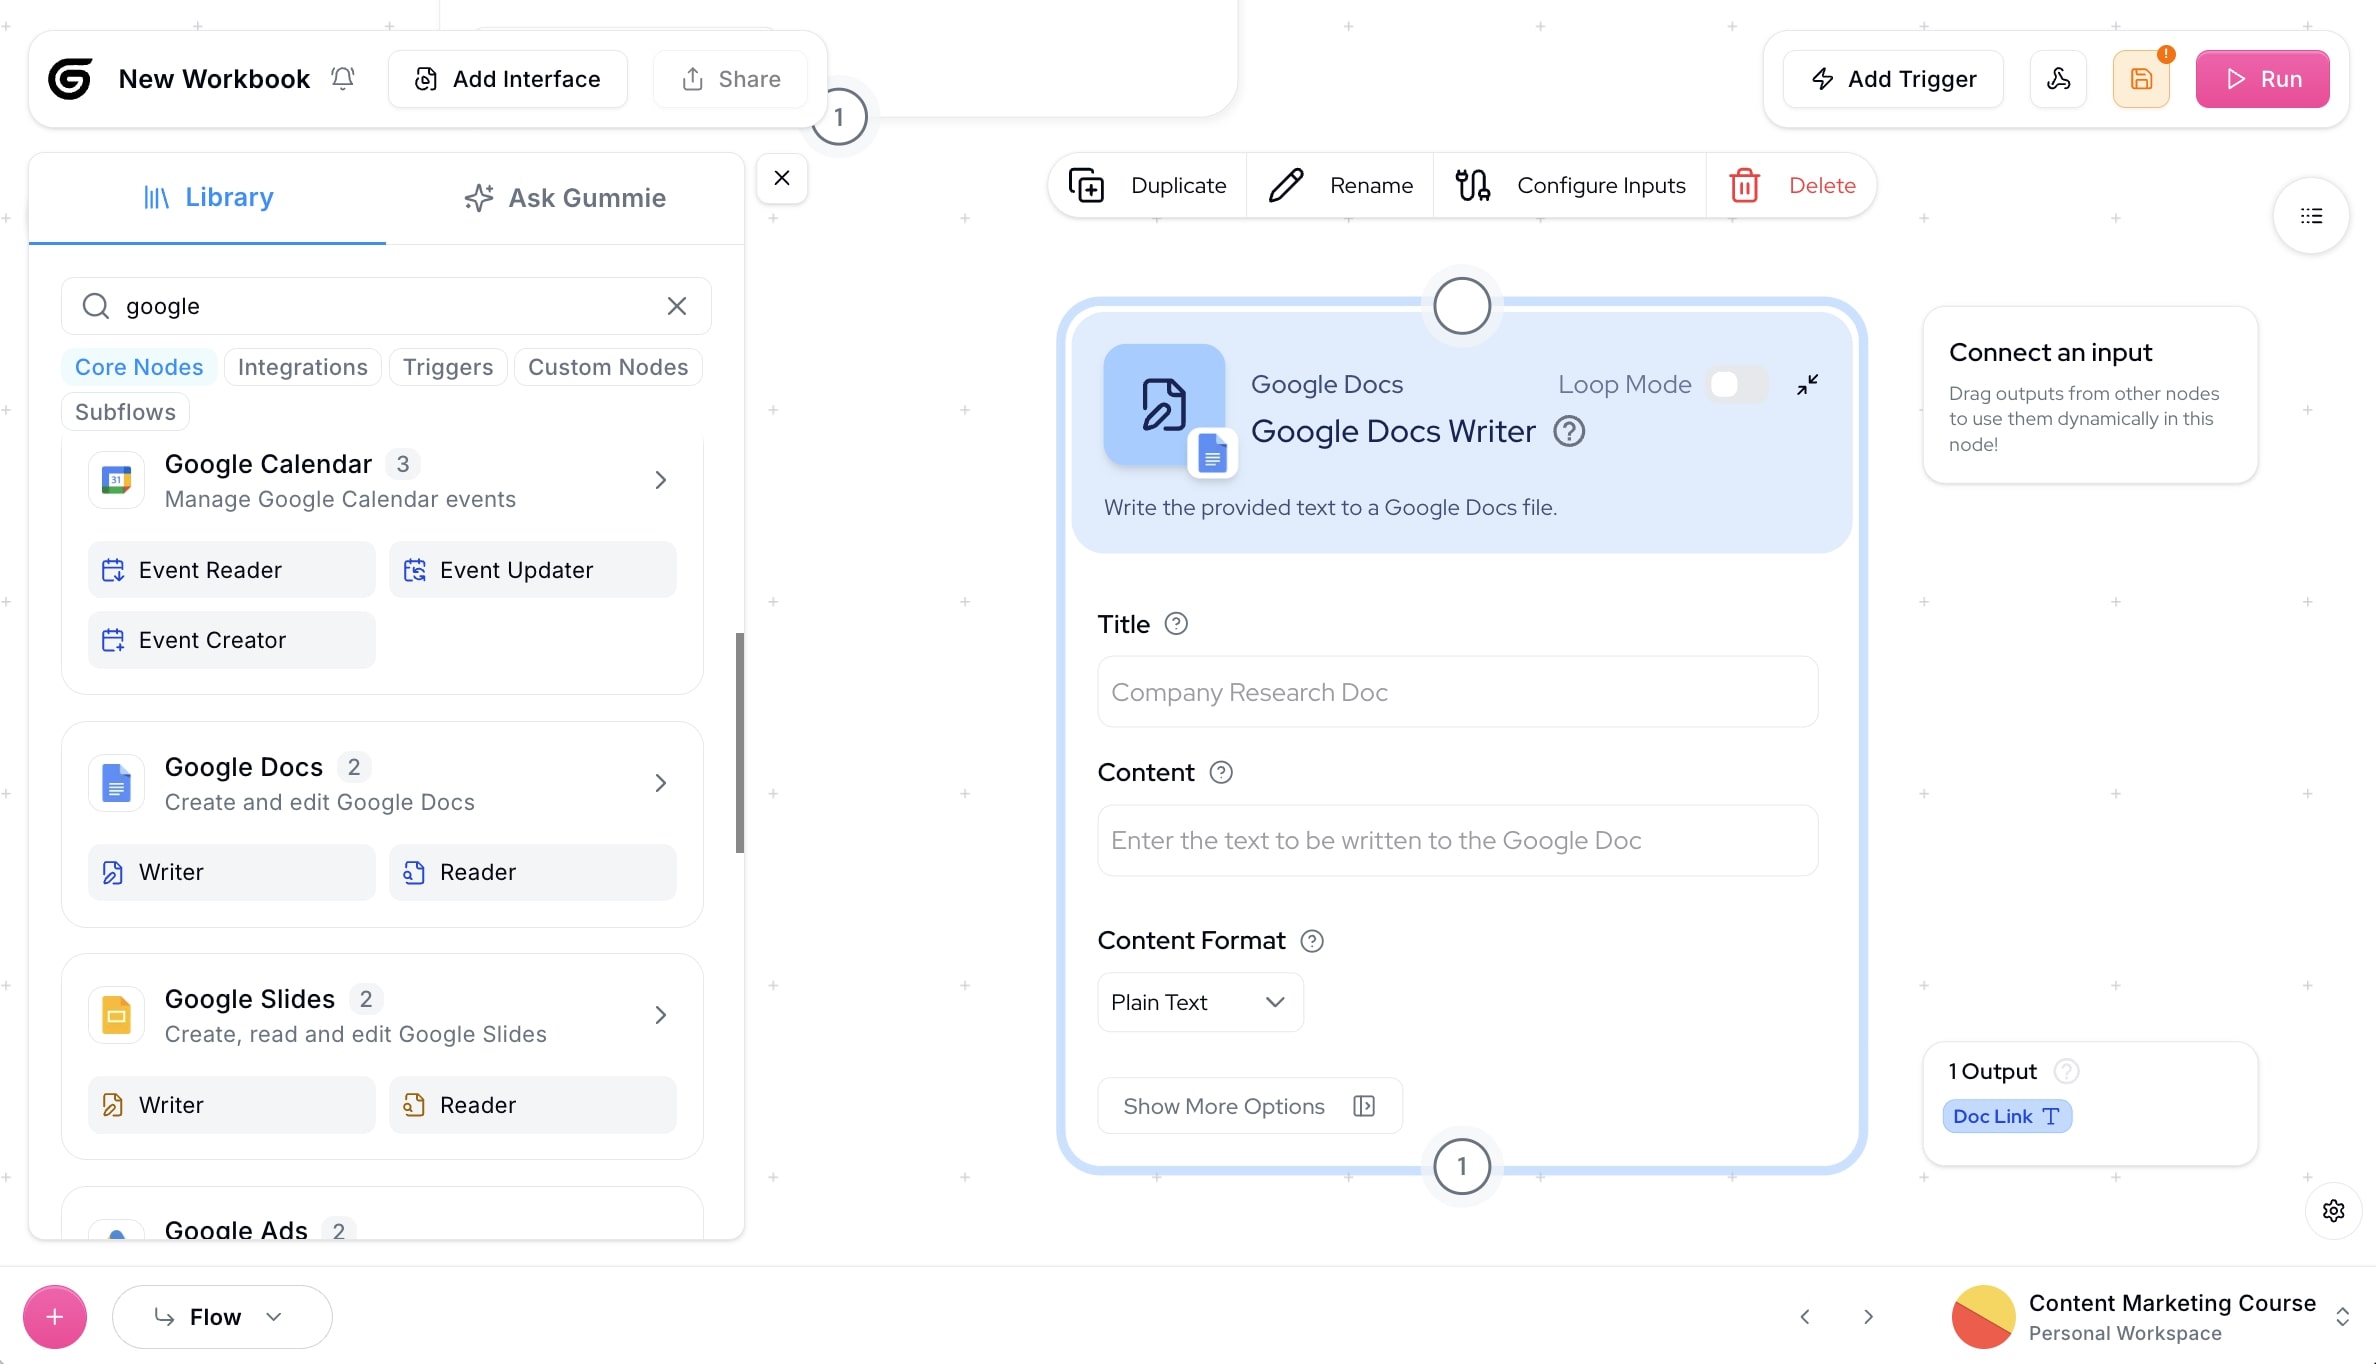
Here, we want to pass the response from ChatGPT into our Google Docs Writer node. We also want to format the content as markdown — this way all of our headings will be nice and clean in our Google Doc.
Now, for the title, we can either manually add a title in the Google Docs Writer node, or we can create an input at the start of our workflow (we’ll go over this in step four). At this point, we are pretty much done. Let’s now test our flow and make some optimizations.
4. Test and refine your workflow
Now, let’s input a keyword into our outline workflow automation and click run. In this case, I’m going to create a blog outline targeting the topic “how to make a website.”
Once we type that into the Google Search node, we’ll click run and wait for a link to our Google Doc!

As you can see, the AI automated workflow ran perfectly. Now, let’s click on the output which is a Google Docs link.
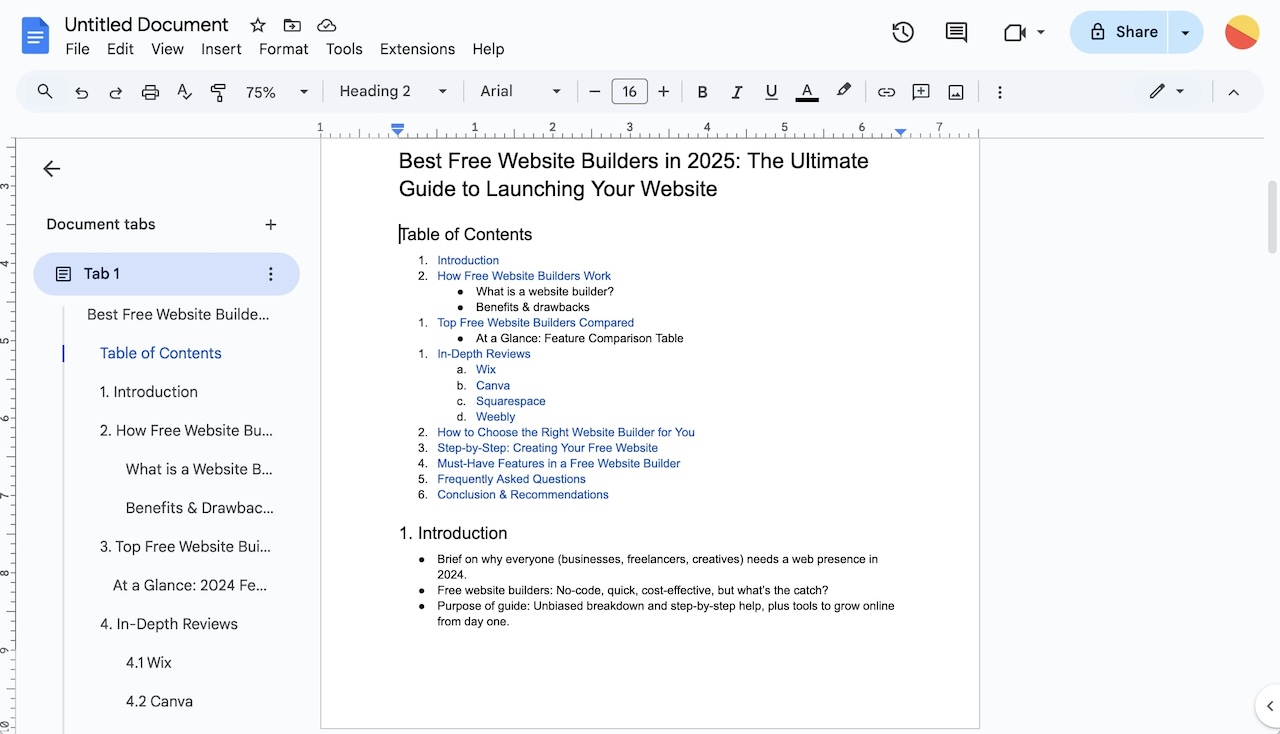
Tada! 🎉 We just automated a task with ChatGPT and Gumloop — super powerful.
The blog outline is four pages long and super in-depth.
But, you’ll notice that the document has no title. And also, what if we want to give our team members access to this cool automation we made? After all, we literally just made an AI app without writing any code.
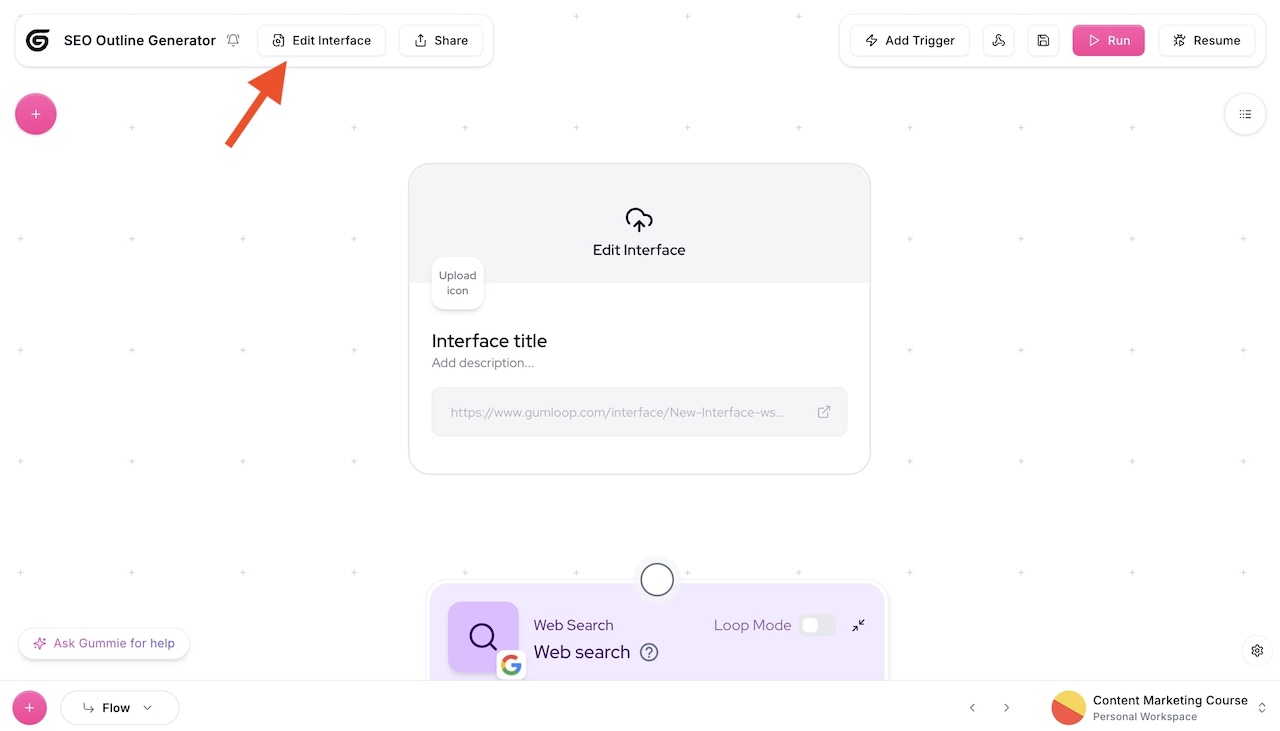
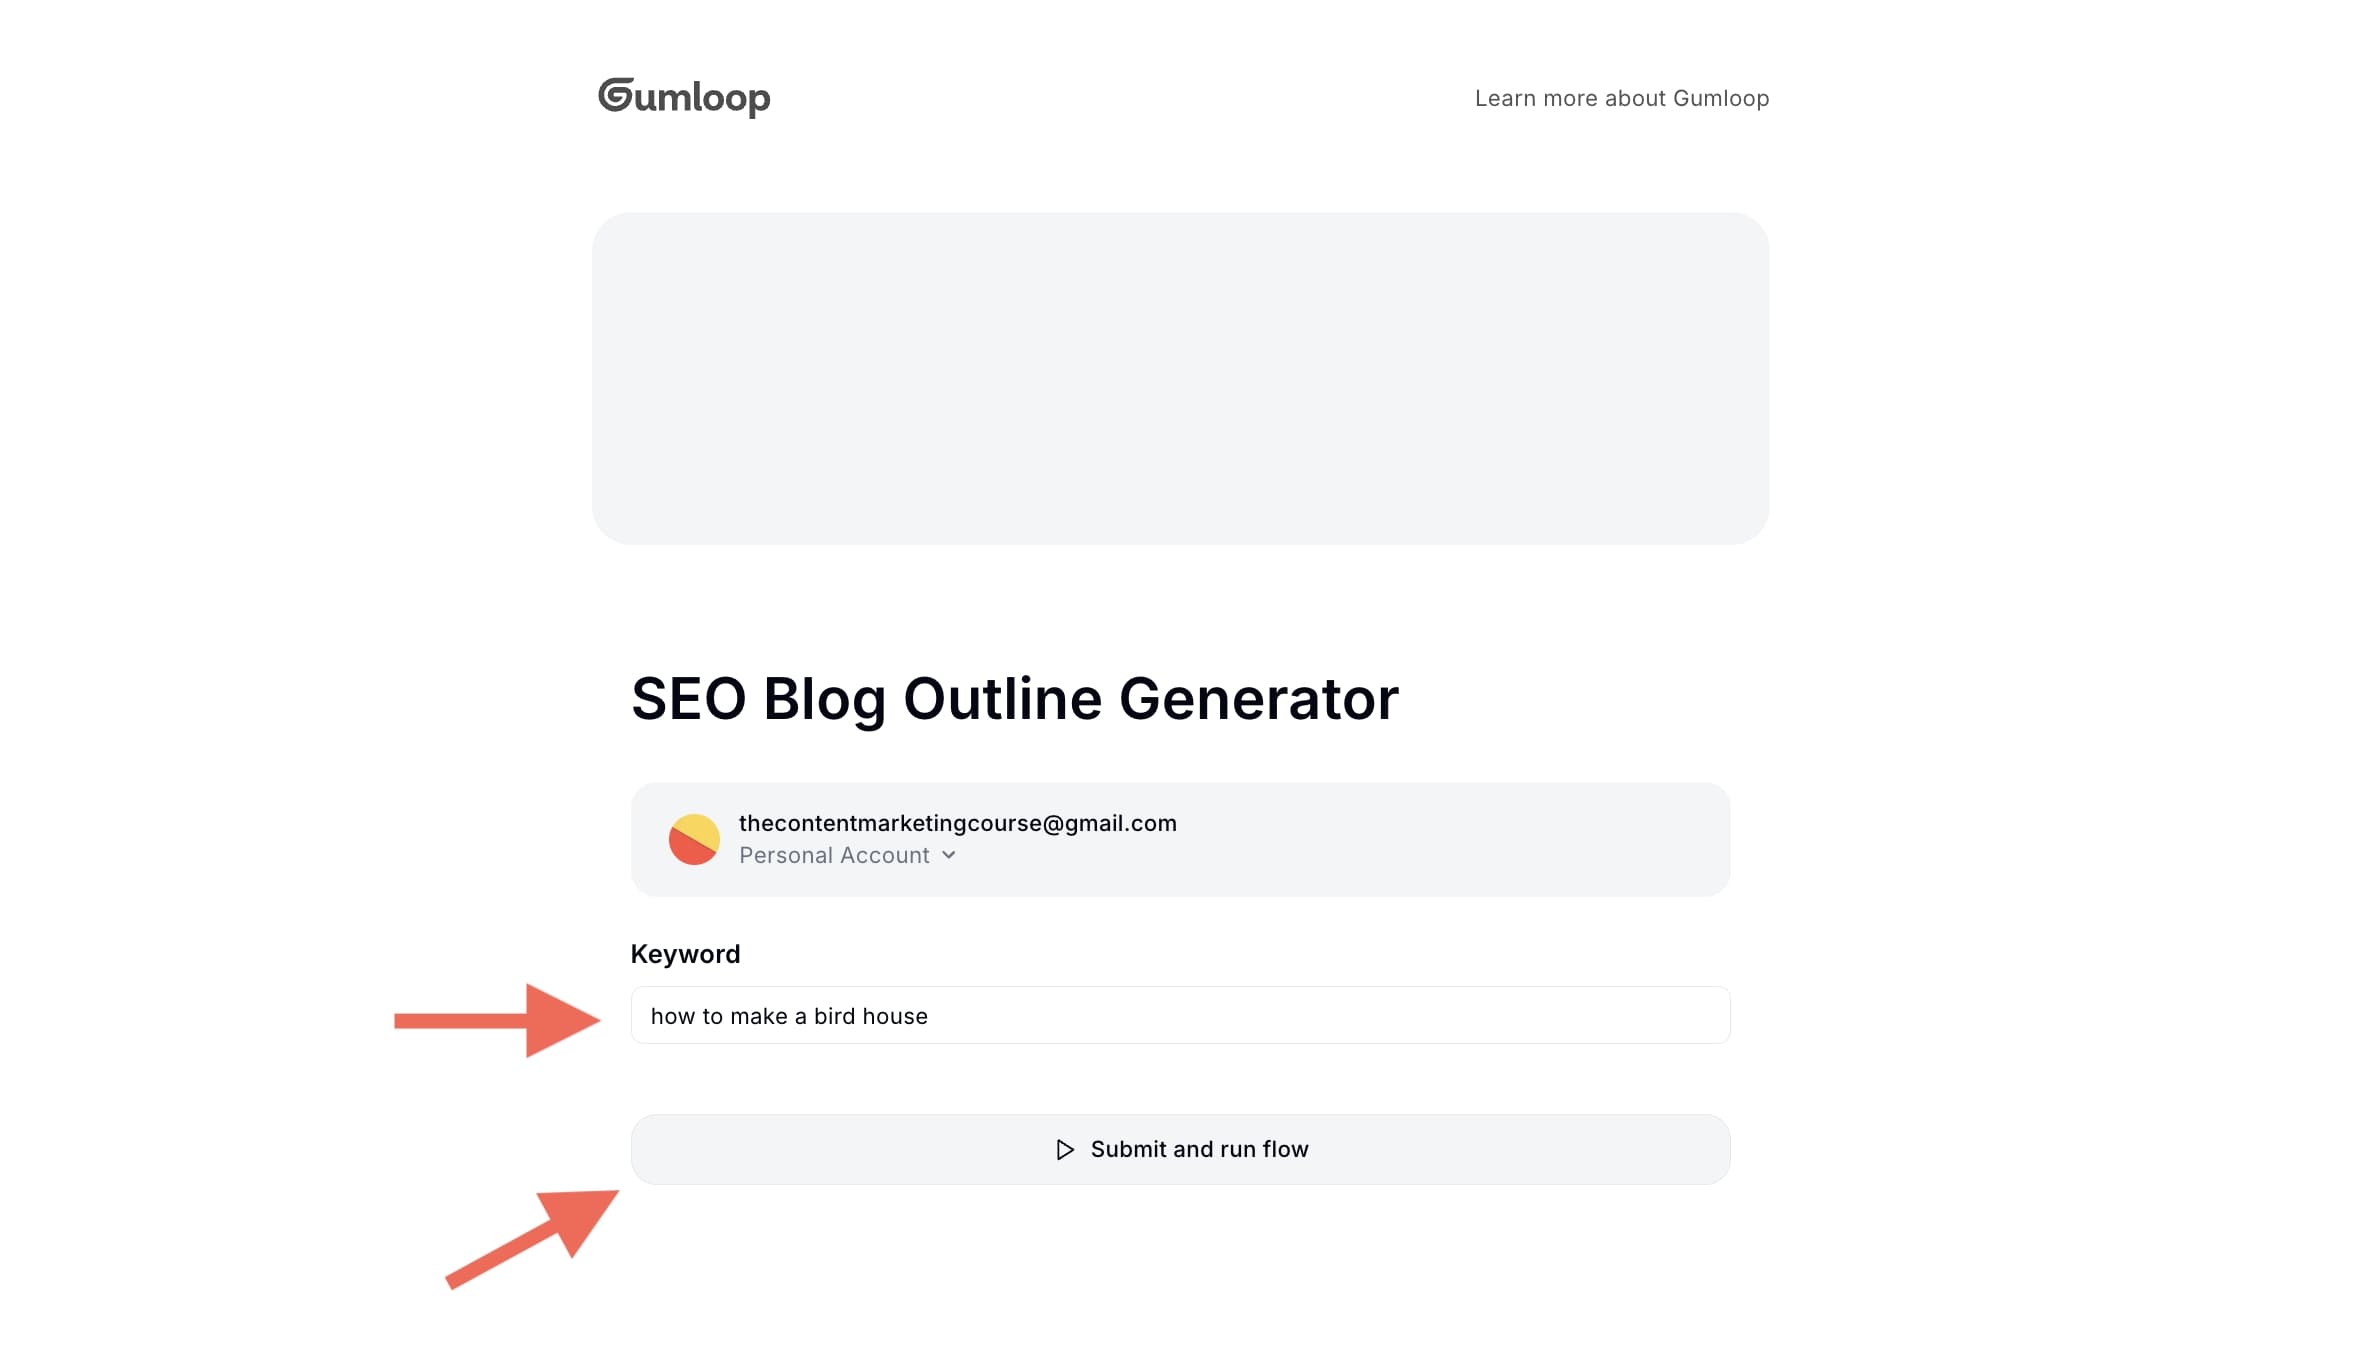
Well, this is where Gumloop Interfaces comes into play.
Let’s go back to our workflow. Here, we want to click on Add Interface and place this node as the first step to our entire automation workflow.
Next, we want to edit our interface to add an input field for our keyword. We do this by adding a Text field.
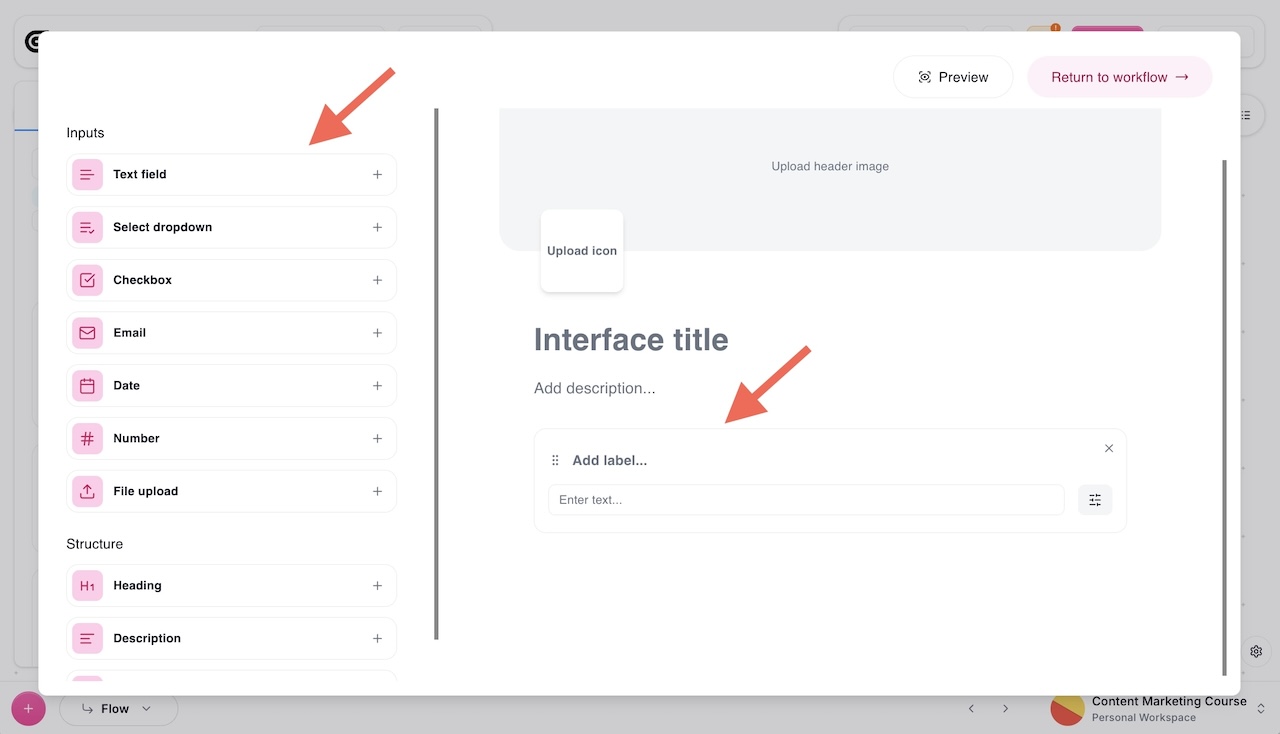
Now, when we go back to our Interface node, we will see an output based on the text field we created. In this case, I named it “keyword” for the interface output conenction. We then connect this output as the main input query for our Web Search node.
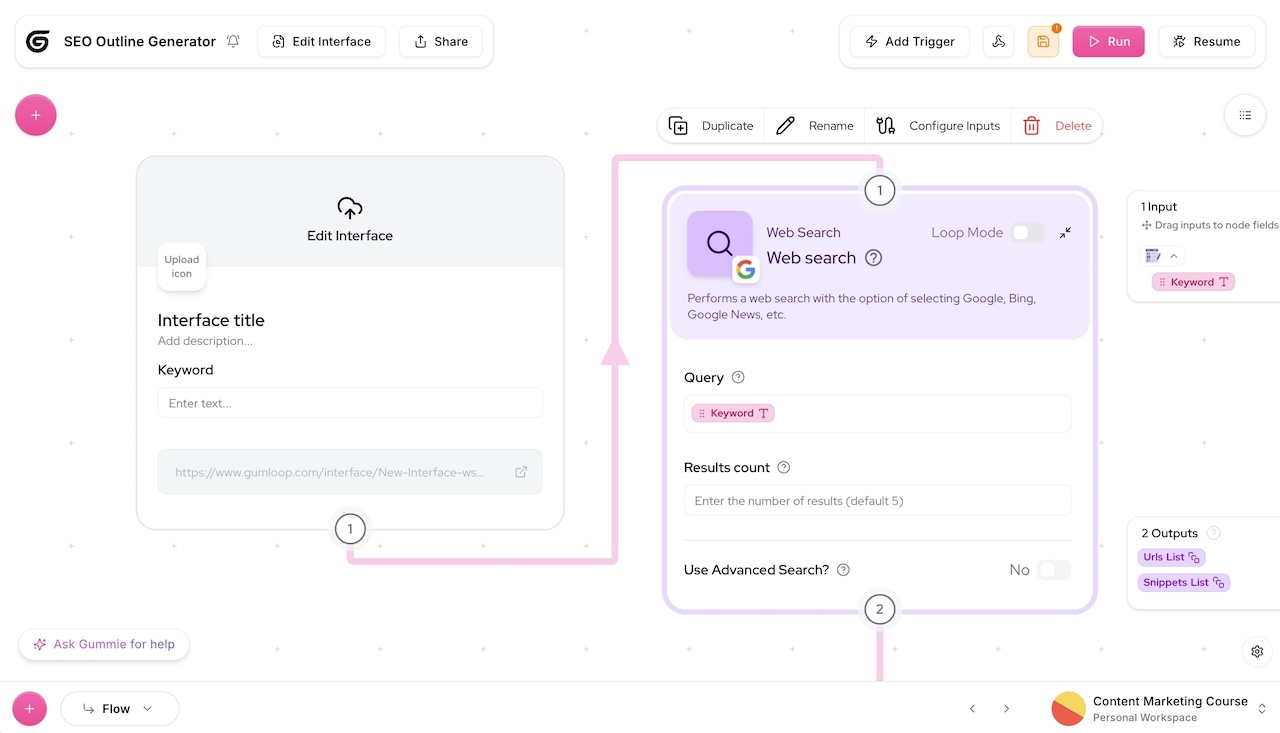
Now, we need to add an output node to our interface and show our Google Doc once we input a keyword and run the flow.
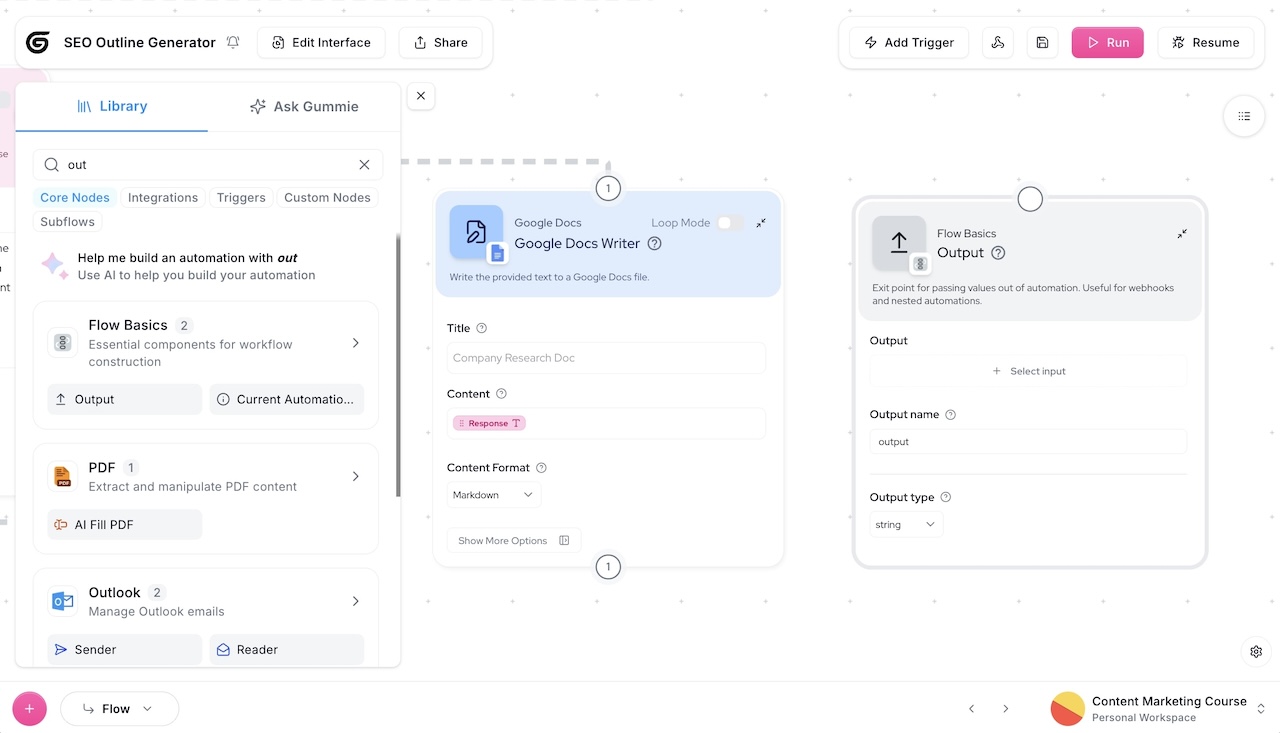
Here, we connect the Google Doc link to our Output node. We can also connect our initial keyword input as the title in our Google Docs Writer node (this way our outlines will generate with the document file name as our keyword input).
Here is the complete new workflow for our blog outline generator:
Now, let’s save everything and open our Interface.
In this case, I’m going to type in the keyword “how to make a bird house” and then click run.
Now let’s click on the output.
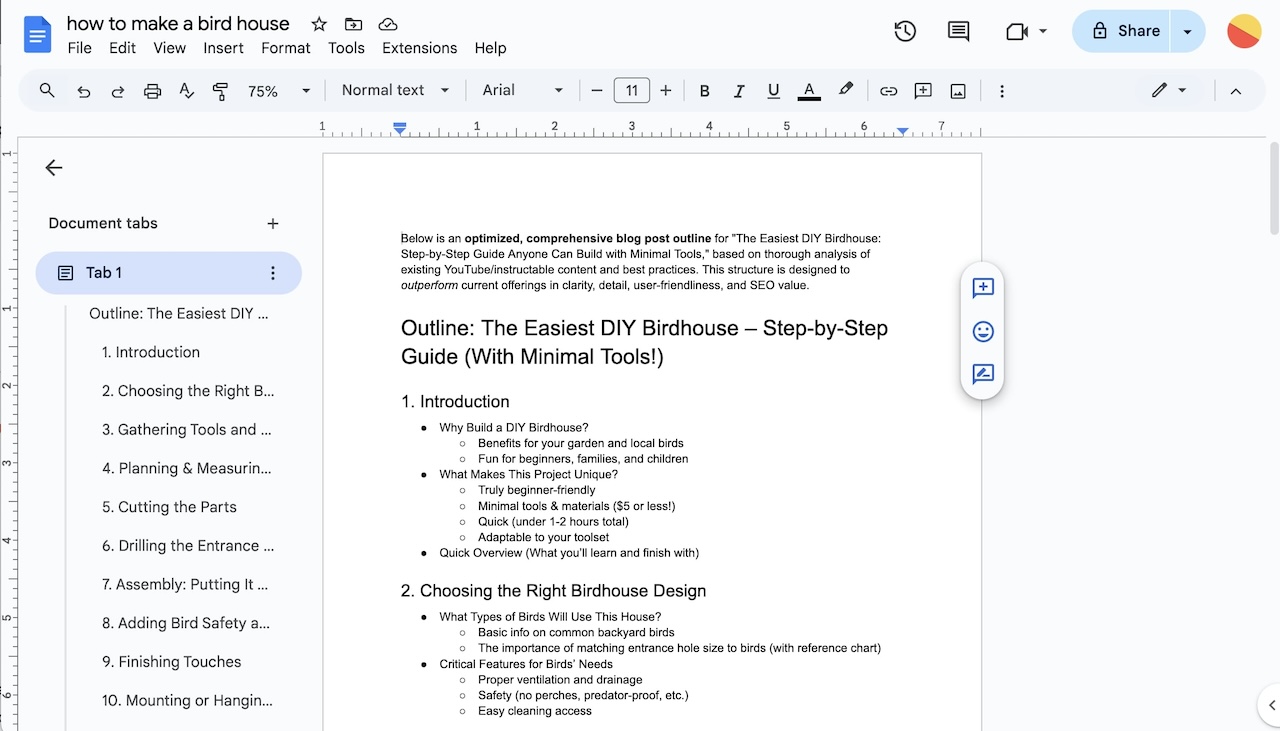
There we go! We have a full working blog outline generator app we can share via a link!
As you can see, automating tasks with ChatGPT and Gumloop is powerful. The opportunities are endless to what types of workflows you can automate.
Just sign up for a free account and start playing around with Gumloop!
Why automate tasks with ChatGPT?
As AI automation tools continue to evolve, the way we approach work begins to change as well. Today, you might be doing research manually, inputting data into a Google Sheet manually, and managing a bunch of tasks you may not even know you could automate.
But when you automate all the repetitive tasks you do on a regular basis, you free up valuable time to do the most important work — the creative stuff.
AI is here to stay, but that should not make you worry. In fact, it should make you excited. It’s here to help you. It’s here to help buy back your time so you can focus more on the things you value — whether that’s doing more creative work or simply spending more time with loved ones.
And now that tools like LLMs and Gumloop exist, creating AI automated workflows is more accessible than ever. I hope you’re just as excited as I am.
Now go out and automate some tasks!
agree to our Terms.


Get the weekly newsletter keeping +33,000 marketers in the loop.